(English,
a magyar változatért görgess lejebb)
As we observed in our first post the "Retrocalcaneal Exostosis" aka. heel spur is a common misdiagnosis for every kind of different heel pain. Based on the diagnosis, heel spur causes inflammation in the 'bursa' between the heel bone and Achilles-tendon. Original medical therapy (the use of anti-inflammantory drugs) is not working, because most of the cases there is no inflammation present at all. So, people are seeking for different solutions. The real problem is mostly on the myofascial level, so it can react very well to yoga therapy and massage therapy as well. In the recent post, I've pointed out the proper problem and shown the appropriate triggerpoints to treat. If you are really facing with a misdiagnosis, simply treating them correctly can solve the whole problem.
In this post, we will discuss how to treat them in a more detailed fashion and add some important yoga asanas to our toolbox. Also, we will talk about some other included factors and muscles to treat, following the transformation in the pain patterns.
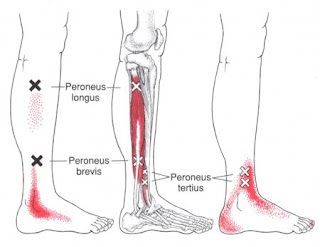
First, these are the most important trigger points to treat on the calves and sole with self-massage therapy:


The best way to massage the calf and sole muscles is to combine the foam rolling, the broomstick and the massage ball (tennis ball, golf ball or baseball) techniques. Begin with the foam roller from the Achilles-tendon vertically into the direction of the kneecap and stop on the first spot, where you experience pain! That means, you've already found the frist two triggerpoints (TrP1 & TrP3) on the Soleus. Then hold the foam roller in place and move your lower leg horizontally, left and right on it for 2-5 minutes!

Then continue upwards until the Gastrocnemius, stop where you experience pain and hold the foam roller in place and do the horizontal, left-right motion for another 2-5 minutes on the Gastrocnemius (TrP1 and TrP2)!
After you've finished, change to the massage ball, put it under the Gastrocnemius and massage the remaining two triggerpoints (TrP3, TrP4) for an additional 2-5 minutes! Finish the circle with the Tibialis Posterior triggerpoint! Massage it for 2-5 minutes!


After the calves, change to the sole! Use a hard massage ball first and locate the triggerpoint on the Quadratus Plantae! Massage it for 2-5 minutes then change to the broomstick! Put it to the floor, place it under the triggerpoint and walk on it horizontally, left and right for an additional 2-5 minutes!


The most important triggerpoints are always the ones, which have direct pain reference with your heel. That means, you have to experience the same kind of pain you usually do. That is the direction of your self-massage therapy.
After you've completed this program, you can move on and stretch the muscles of the calves. If you have intense heel pain it is very important to stretch the calves while you do not put weight on the heel. The best technique is for this when your heel is on the air:

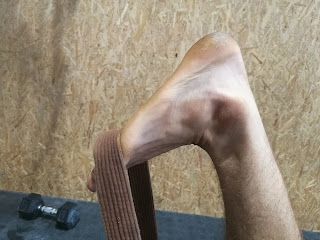


Keep your knees as straight as possible and position the yoga strap (or towel or anything useable) to pull your toes into the direction of your forhead. The goal is to create an acute angle between the feet and the shinbone, so move the feet as close to the shinbone as possible. Mind, that your thigh bone is not allowed to rotate internally. So keep the kneecap facing exactly back- and downward to completely avoid internal rotation.
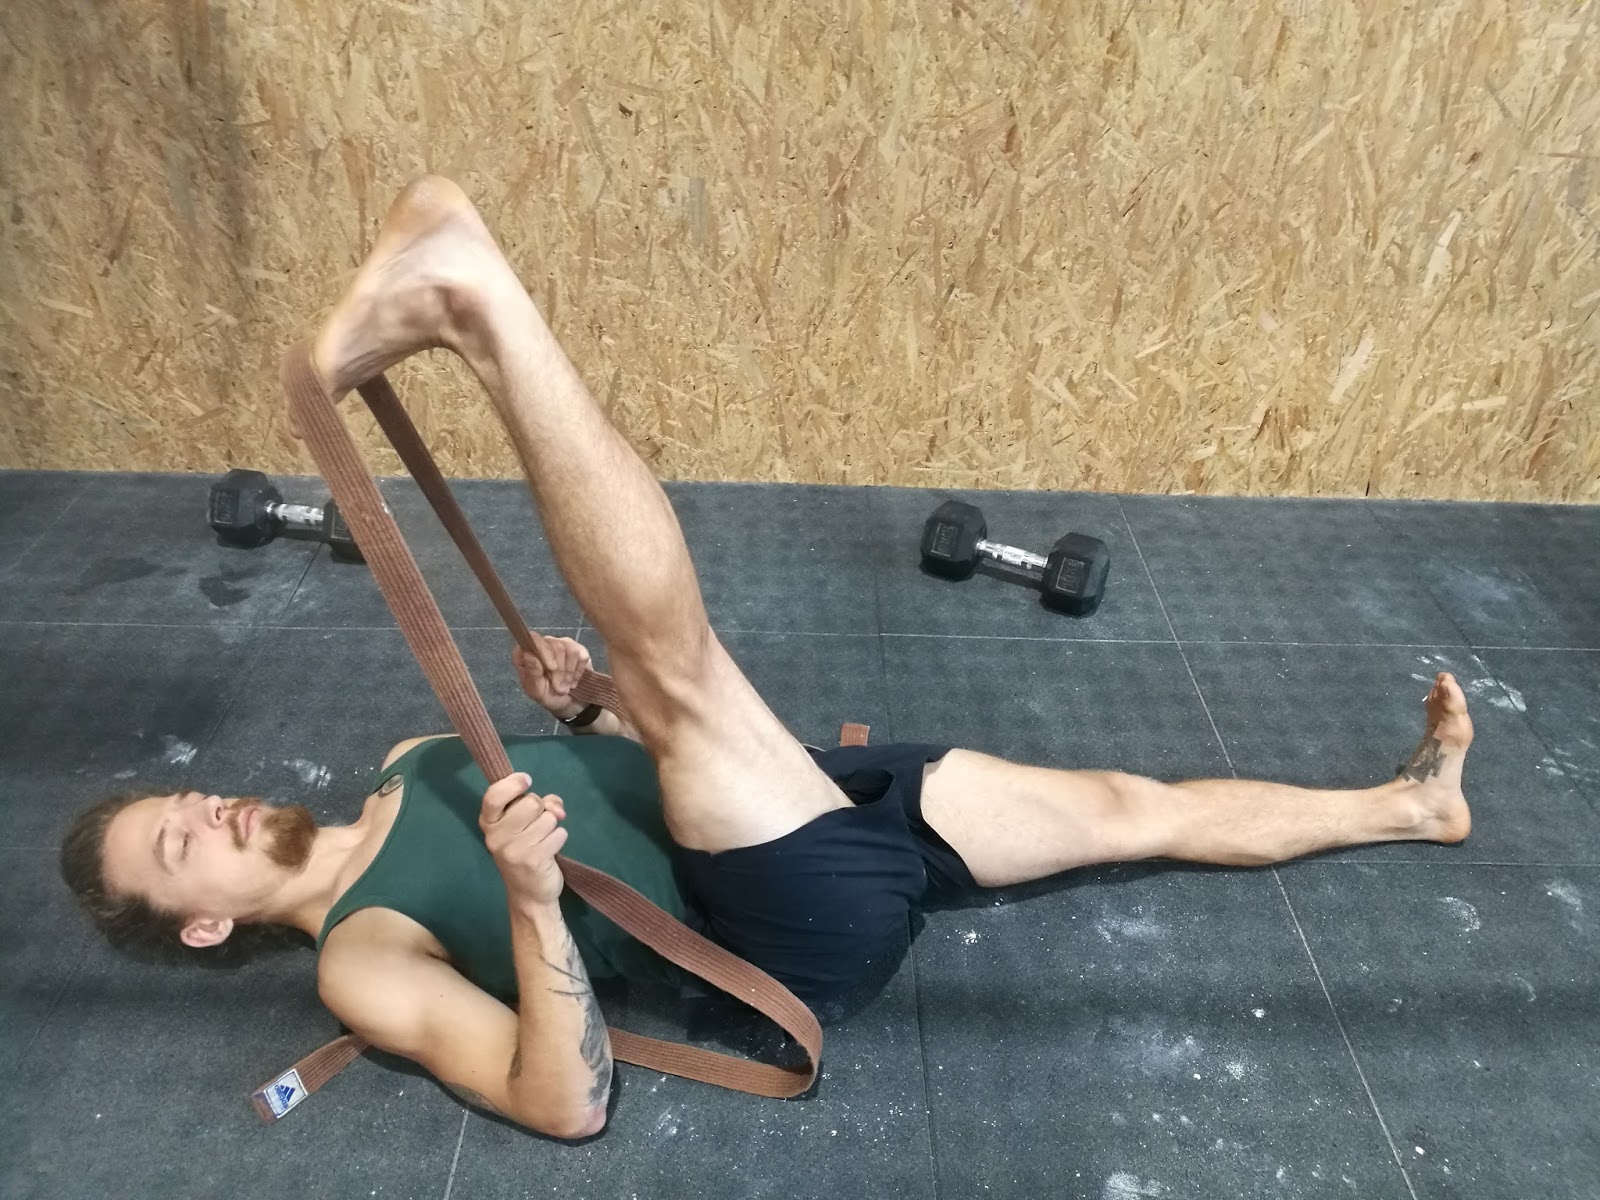
Another possible and effective yoga asana without acut heel pain and without lumbar spine disk herniation is the modified Uttanasana:


Begin with the dynamic version! Sit on a chair, lean forward and connect your abdominal muscles strongly to your Quadriceps! Imagine, there is a leash between your abs and quads and a strong dog is on the other side of it. Do not let the dog pull it out, so keep the connection as strong as possible! In the meantime, provide the spinal traction/decompression with stretching forward with the top of the head from the sacrum and stretching forward with the strenum into the direction of the floor. Only until you can maintain these activations perfectly, straighten your knees, lean forward and after you've reached your maximum (still with your quads on the abs) sit back, slowley. Complete 10 reps from this dynamic exercise, then hold the asana statically for 60-90 seconds.
In case you did the self-massage treatement and yoga asanas punctually and the original pain disappears, due to the compensation patterns it can move into other directions as well. Because of the original discomfort, you've changed the pattern of every step you take and that could cause pain in other structures too. In this case, the inner (Abductor Hallucis) and outer heel (Abductor Digiti Minimi), the outer ankle (Peroneus Longus, Peroneus Brevis, Peroneus Tertius) and the outer feet can also hurt. To treat them, massage the following triggerpoints:


Use the same foam rolling and massage ball techniques on all the trigger points, you did on the calves for 2-5 minutes:


After you've finished, use the Tadasana variation to complete the myofascial release procedure, you can see on the picture below:

The goal is not to completely straighten your knee, but to keep the proximal phalanges of the toes on the floor, so keep the feet perpendicular to the floor the whole time.
...


A legjobb módja annak, hogy saját magadnak masszírozhasd a vádli és talpizmokat a masszázslabda (tennisz, golf, baseball stb.), a masszázshenger és a seprűnyél kombinált használatában rejlik. Kezdd a masszászhengerrel és haladj az Achilles-íntól függőlegesen felfelé a térdhajlat irányába és állj meg az első ponton, ahol fájdalmat érzel! Ez azt mutatja hogy máris megtaláltad az első kettő triggerpontot (TrP1 & TrP3) a Soleus-on. Itt állítsd meg a hengert és mozgasd a lábad a hengeren vízszintesen 2-5 percig!


...
(Magyar)
Ahogyan azt az első bejegyzésünkben már elemeztük, a "Retrocalcaneal Exostosis" vagyis sarokcsonti sarkantyú egy klasszikus diagnózis mindenféle sarokkal kapcsolatos fájdalom esetében. A diagnózis alapján a sarokcsonti sarkantyú gyulladást okoz a sarokcsont és az Achilles-ín között található "bursában" (ízületi folyadékot tartalmazó tömlő). A konzervatív orvosi terápia (a gyulladáscsökkentők alkalmazása) általában nem működik, ugyanis a legtöbb ilyen diagnózis esetén gyulladásról egyáltalán nem is beszélhetünk. Tehát a páciensek egyéb megoldásokat keresnek. Mivel a valós probléma az esetek többségében az izmot körülvevő kötőszöveti pólyában található, ezért a kliens fájdalmai csökkennek a jógaterápia alkalmazásával. Az előző bejegyzésben már elemeztük a valós problémát és megmutattam a nyomásra érzékeny ún. triggerpontokat, amelyeket masszírozva komoly eredményeket érhetünk el a fájdalom megszüntetésében. Hogyha valóban tévesen diagnosztizáltak sarokcsonti sarkantyúval, akkor pusztán a megfelelő pontok masszázsa a megfelelő módon és a megfelelő gyakorlatok elvégzése (szintén a megfelelő módon) nem várt, pozitív változást hozhat az állapotodban.
Ebben a bejegyzésben részletesebben megbeszéljük, hogyan kezeld ezeket a nyomásra érzékeny pontokat és az eszköztárunkat néhány alapvető fontosságú jóga ászanával is kiegészítjük. Ezen kívül elemzünk még néhány olyan lényeges faktort, amelyek a további kezelésben nyújthatnak segítséget, követve a fájdalom-mintázatok átalakulását.
Először is, itt vannak újra a legfontosabb triggerpontok, amelyeket ön-masszázs technikákkal kezelhetsz:


A legjobb módja annak, hogy saját magadnak masszírozhasd a vádli és talpizmokat a masszázslabda (tennisz, golf, baseball stb.), a masszázshenger és a seprűnyél kombinált használatában rejlik. Kezdd a masszászhengerrel és haladj az Achilles-íntól függőlegesen felfelé a térdhajlat irányába és állj meg az első ponton, ahol fájdalmat érzel! Ez azt mutatja hogy máris megtaláltad az első kettő triggerpontot (TrP1 & TrP3) a Soleus-on. Itt állítsd meg a hengert és mozgasd a lábad a hengeren vízszintesen 2-5 percig!
Ezt követően haladj felfelé a Gastrocnemius irányába, állj meg ott, ahol fájdalmat érzel, majd tartsd ott a hengert és végezz vízszintes mozgásokat jobbra-balra a Gastrocnemius-on (TrP1 és TrP2) további 2-5 percig!
Amint végeztél, válts a masszázslabdára, helyezd a Gastrocnemius alá és masszírozd a még visszalévő kettő triggerpontot (TrP3, TrP4) további 2-5 percig! A labdás kört a Tibialis Posterior izommal fejezd be! Masszírozd 2-5 percig!
A lábszár után válts a talpra! Használj egy kemény masszázslabdát és határozd meg a nyomásra érzékeny pont helyét a Quadratus Plantae izmon! Masszírozd 2-5 percig, majd válts a seprűnyélre! Helyezd a padlóra, állj rá a triggerponttal és gyalogolj rajta jobbra és balra további 2-5 percig.


A legfontosabb triggerpontok mindig azok, amelyek nyomás hatására közvetlenül olyan jellegű fájdalmat sugároznak ki, amelyet általában a sarkadban érzel. Ez azt jelenti, hogy a masszázs során is ezt a fájdalmat kell érezned, annak implikációjaként, hogy megtaláltad a megfelelő triggerpontot.
Ezt követően haladhatsz tovább a lábszár izmainak nyújtásával. Amennyiben intenzív sarokfájdalmat érzel, nagyon fontos, hogy olyan módon nyújtsd a lábszár izmait, hogy a sarokra ne helyezz súlyt. A legjobb technika erre nézve, hogy a sarkad végig a levegőben tartsd:

Tartsd a térded annyira nyújtva, amennyire az lehetséges és helyezd a jógahevedert (vagy egy törülközőt vagy akármi mást, ami használható erre a célra) a lábujjpárnád alá, hogy a homlokod felé tudd húzni a lábujjaid hegyét! A cél, hogy egy hegyesszöget képezz a lábfejed és a lábszárad között vagyis a lábfejet olyan közel húzd a lábszáradhoz amennyire csak tudod. Figyelj arra, hogy a combcsontod nem csavarodhat befelé, szóval tartsd a térdkalácsod pontosan hátra és lefelé néző állapotban!
Egy másik hatékony jóga ászana – ha már nem érzel akut sarokfájdalmat vagy nincs lumbáris porckorongsérved – a módosított Uttánászana:


Kezdd a dinamikus verzióval! Ülj egy székre, dőlj előre és a hasfalad fektesd a combjaidra! Képzeld azt, hogy egy nagytestű, erős kutya pórázát szorítod a hasfalad és a combjaid között! Tartsd ott erősen, semmiképpen se hagyd, hogy kihúzhassa onnan! Tartsd a gerinc nyújtózását (trakció/dekompresszió) a keresztcsonttól a fejtetőig és nyújtózz a szegycsonttal is előre! Csak addig nyújthatod a térded, amíg ezeket az aktivációkat képes vagy tökéletesen megtartani. Amint elérted a maximumot (a hasfaladdal még mindig a combodon), szép lassan ülj vissza a székre! Hajts végre 10 ismétlést ebből a gyakorlatból, majd tartsd meg a végpozíciót 60-90 másodpercig!
Végül, ha megfelelően végezted az ön-masszázs gyakorlatokat és a jógaászanákat és az eredeti fájdalom el is múlik, a kompenzációs struktúrák következtében – vagyis azért, hogy egy területet megkímélj, terhelsz egy másikat – a fájdalom tovább "vándorolhat" a belső sarkad (Abductor Hallucis), a külső sarkad (Abductor Digiti Minimi), a külső bokád (Peroneus Longus, Brevis és Tertius) és a külső talpéled irányába. Ennek kezelésére a következő triggerpontokat masszírozd:


Használd a korábbiakban már ismertetett masszázshengeres és -labdás technikákat mind a három triggerponton (Peroneus longus, Peroneus brevis, Peroneus tertius) mind a három helyen 2-5 percig:
Miután ezzel is végeztél a terület nyújtására alkalmazd a képen látható, módosított Tádászana változatot:

A cél nem az, hogy teljesen kinyújtsd a térdeket, hanem az hogy a lábujjad utolsó ujjperceit (proximal phalanges) végig a talajon tartsd, a talajra merőleges lábfej pozíciót létrehozva.
Nincsenek megjegyzések:
Megjegyzés küldése